Idiot’s Guide to Dry Lining
This post may contain affiliate links. At no cost to you, we earn a commission from qualifying purchases.
When it comes to DIY projects, dry lining is one of the most popular for homeowners to tackle on their own.
Although you don’t need to be particularly skilled to install dry lining, it is however important that you have all the right materials, tools and knowledge, whilst working in a methodical manner.
This guide serves to provide even the newest DIY enthusiast with all the information required to successfully complete the job.
Materials selection
When it comes to picking out the materials you intend to use on your dry lining project, the key decision is what board to use.
Before you make your selection you should first consider which room in the house the work will be carried out and what you hope to achieve from the installation. So, if you are erecting a partition wall in order to create a new bedroom, it is essential to source a board that has proper sound insulation.
Where you are dry lining a bathroom, the board will, of course, need to be moisture resistant.
Other attributes that plasterboard can have include resistance from impact and also fire.
And if you intend to board a ceiling then you should be looking at specialist boards which are 4-5mm thinner than standard ones.
A final consideration to take into account is how much weight the board is able to handle per screw. This point is especially important where items may be mounted on a wall in a location that does not allow them to be screwed directly into a noggin.
Joining technique
Before you move on to the task of getting together all the tools you are going to need, you should first decide which technique you will use to join the boards together.
The first option is used when installing wall boards with a tapered edge and entails covering joints with specialist tape (or scrim cloth), before filling and then floating off.
Your second option, used on square-edged boards, is to apply glue to the joints, which should be scraped to remove any excess, before floating off.
The final option is to be used when joining offcuts together and sees a gap of 5-7mm is left, which is then filled, before floating off.
Required tools
It can be tempting to try and save some cash when tackling dry lining and try to make do with the tools that you already have. However, scrimping can result in frustration when it comes to the installation process, which in turn can result in mistakes being made.
The tools that you will require to complete the job are:
- Electric screwdriver to secure the boards in place. If you are using steel studwork then it should have a minimum speed of 3500rpm to avoid lipping.
- Pneumatic gun to be used where boards will be stapled or nailed to a timber stud.
- Electrical or hand saw to cut the board. If an electrical saw is used then be sure to use the vacuum feature to extract dust.
- A scraper to remove excess joining glue and also to apply joint filler. It is advisable to have one for each job.
- Utility knife for scoring the boards before cutting. A model with a retractable blade will help maintain an even cut. If you already have one then make sure that you fit a new blade before you start.
- Sandpaper for smoothing down filler used in joints.
- Specialist decorating sponge so that you can stipple the joints where filler is used.
- A bucket and trowel used to mix the filler (the cleaner the better).
- Steel float.
Storage and handling
Most plasterboards will come with a protective plastic coating, which should be left on until you are ready to carry out the work.
Store the boards in a nice dry environment and on a flat surface to prevent bowing. If the boards do somehow get damp, wait until they have completely dried out before commencing with the job.
When it comes to handling the boards, whether you are simply moving them to storage, or manoeuvring them into place to be secured, it is certainly worth having a second pair of hands. Even the most experienced plasterers can damage and or break boards when working alone.
Always carry the boards on their edge to minimise the risk of damaging them.
If you are dry ling a ceiling then you may wish to consider the use of mechanical board lifters to make the job easier.
Cutting boards
There are two cutting methods that can be used to shape the plasterboards to the desired dimensions.
The first is the use your utility knife to score the board, before snapping along the line using your hands. If you use this method then be sure to set the retractable blade accurately to give a deep score, which will mean only a small amount of pressure is required to achieve the snap.
The alternative is to cut the boards with an electric or hand saw.
If you go for this option then use a blade that has tungsten carbide saw tips, or that is made from tempered steel.
Fixing the boards
When it comes to the fixing stage, the first factor to consider is what jointing technique you will be using.
If you are using glue then this must be applied as you work and before each board is put in place. Where you are using tape or joint filler, you can wait until all the boards are in place and then carry out the jointing in one go.
It is best practice when fastening the boards to the wall or stud to either start at one side of the board and work your way across to the other edge, or start from the centre and work your way outwards. If you fix the corners of the boards first it can overstress the board.
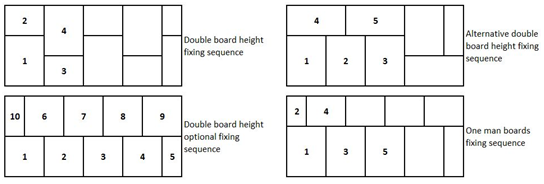
Finally, when it comes to putting the boards up, it is important to follow a suitable fixing sequence, ensuring that joints are staggered. The image above shows the fixing sequences that you can use, depending on board sizes.
Finally, when it comes to putting the boards up, it is important to follow a suitable fixing sequence, ensuring that joints are staggered. The image above shows the fixing sequences that you can use, depending on board sizes.
Thanks to Building Materials for this useful guide on dry lining.